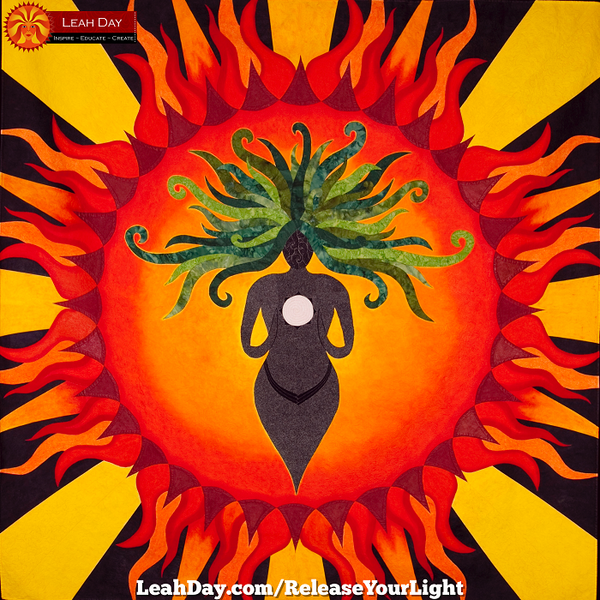
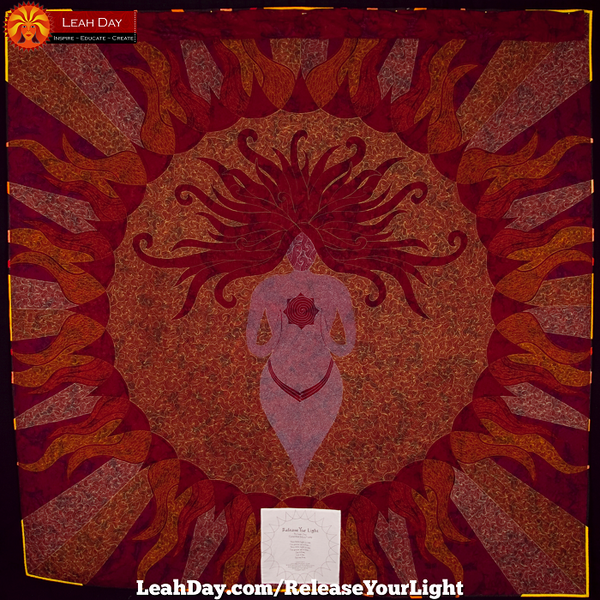
Release Your Light Goddess Quilt
Finished Size - 77.5 x 77.5 inches
2nd Quilt in the Goddess Series
Completed July 2009
 |
Would you love to read the inspirational quilting stories behind all of Leah's goddess quilts? In 2019 Leah published her artist memoir showcasing the creation of each quilt in the goddess series. This is a story of transformation and how each goddess quilt pushed Leah to become a better woman, wife, mother, and quilter. This is the book quilters have been asking about for years! |
Listen to the podcast or download it to your computer using the player below:
Quick links to things mentioned in this podcast:
|
|
|

Release Your Light began with a dream.
In November 2008, I was laying in bed, feeling pretty sorry for myself and (I'll admit it) wallowing in self-pity. I can't quite explain WHY I was feeling so bad at that time simply because I'm not really sure myself.
 I think the main reason I was upset is because I felt frustrated and limited by what I had designed in The Duchess. It was in a difficult stage and I was bursting to try something new. I felt so filled with creativity, but couldn't use it because I was in neck deep with a quilt I wouldn't finish for 3 more months.
Suddenly I saw this image of a woman bursting with light and creativity. In her hands, she held a ball of light: her creativity. Her light was so bright, it blocked out everything.
I began to hum the song "This Little Light of Mine" that I often sing to my little boy, and I began to get chills! I was so overwhelmed with the image and how much love and power was surging through my body while I thought of it.
I began to change the words of the song until they felt just right:
This little light in me,
I'm gonna set it free,
This little light in me,
I'm gonna set it free,
Set it free,
Let it be,
Set me free.
While this whole experience may sound very weird, it was one of the most powerful and dramatic of my life. I see the figure as a representation of all people. We are all so creative, it's bursting to get out of us! Set it free by trying: sing, dance, paint, quilt - whatever you need to do in order to live a more open and creative life.
 I wanted to start this quilt immediately, but I knew that if I stopped working on The Duchess quilt, I might never finish it. I drew the design on a piece of paper and hung it in my wall so I could look at it every day.
After completing The Duchess, I began to design Release Your Light. My method of designing is little odd. I use large graph paper that I tape together with masking tape until it feels the right size. This can get me into trouble, and it certainly did in this situation!
I wanted the central figure to be the dominate aspect of the quilt, so I started with a very big piece of graph paper. This became a problem because I kept having to tape more and more paper to the quilt as it expanded. Pretty soon, my paper design was covering every inch of my 8 ft x 9 ft table and this was only 1/4 of the quilt!
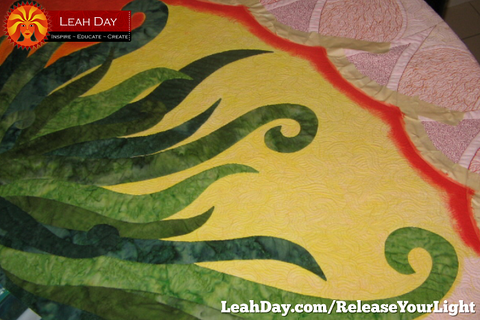
I knew I needed to resize the quilt then, but didn't want to. Call it laziness, call it being stubborn, I wanted this quilt to be BIG! I drew the design and decided to hand appliqué the body and hair of the goddess to the center of the quilt.
Work on Release Your Light slowed to a crawl as I worked on other quilts and projects and hand appliquéd only when I had nothing better to do. It took 2 months to finish the hand appliqué and by that point I had realized that I really didn't like the effect it gave to the quilt. The next time I try an appliqué project, I plan to try machine applique with matching colored thread.
Regardless, I was at a point where I had to decide whether I was going to appliqué the rest of the rays or not. I decided that would probably not see this quilt finished before my son (who's 2) graduated from college if I hand appliquéd all the flames and rays.
So I made the huge leap in judgment to forget appliqué and instead just paint the quilt top with Shiva Paintstiks! I'd gotten the idea from the book (Ad) Quilts of a Different Color by Irena Bluhm and really wanted to try the technique. Irena's technique is to machine quilt the entire quilt, then go back over the surface with paint to add detail and enhance the overall quilt.
Unfortunately I hadn't fully learned my lesson from creating The Duchess and didn't test this technique properly before getting started. I had no idea how long it would take or how much paint I would need to cover this gigantic quilt with paintstiks. I just assumed (wrongly) that painting would be easier and faster than hand appliqué.
So the quilt top was sandwiched and I began quilting. Because I was going to paint the top, I chose not to use trapunto. This means that the whole quilt, almost every inch of all 77 inches had to be quilted with dense filler stitching.
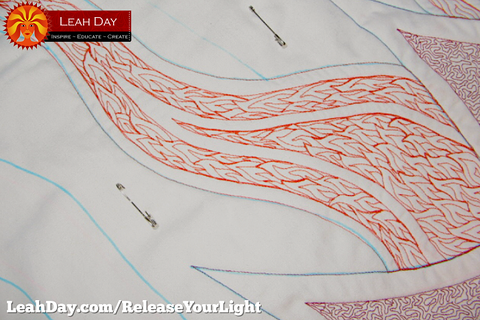
Here is a photo of the quilt before it was painted, but after more than 400 hours of dense filler quilting:
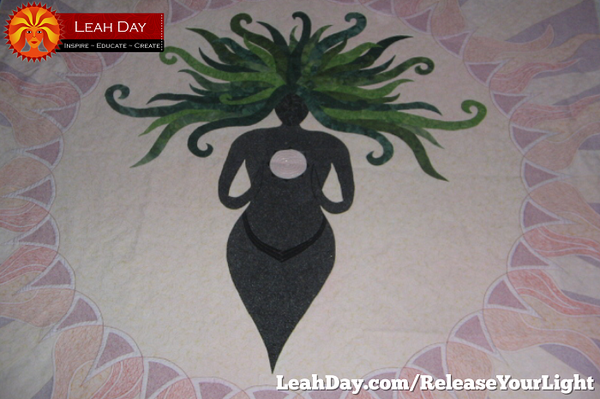
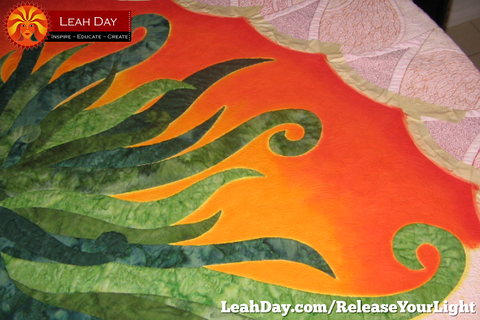
I used dense Microstippling the goddess's body, and McTavishing the circle background. I switched back to dense Stippling in the first set of red triangles. By the time I got to the outer set of flames, I was so sick and tired of these two designs, I wanted to stitch anything else!
I spoke to a quilting friend about it and bemoaned the fact that I really couldn't stitch the other two free motion quilting designs I knew, Pebbling and Paisley. I struggled to quilt these designs at this time because I was using thicker cotton threads for quilting. Besides, these designs didn't really match with the theme of the quilt.
My quilting friend asked: "Why don't you take Paisley and change it a bit?"
This single question changed this quilt and my life! I immediately started playing with the Paisley design and eventually came up with Flame Stitch.
Here is a close up of the dense microstippling and flame stitch used in the ray before it was painted:
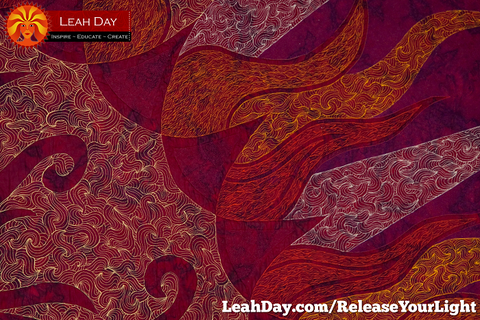
I also decided to make Release your Light my very first 2 sided quilt. I had a huge piece of dark red batik and decided to use that as the backing fabric for this quilt. Because I quilted with bright orange, yellow, and red threads, the machine quilting designs stand out boldly on the back. This is a photo of the back side of the quilt:
Deciding to quilt so densly and with so little trapunto was a very expensive and time consuming decision. The more space you fill with trapunto, the less space you have to quilt densely. It's the super dense quilting that is very time consuming and slow on a quilt like this.
It was around this time I began using Isacord Polyester Thread for machine quilting and found it to be perfect for quilting dense designs and travel stitching. I went through more than 8,000 yards of thread in 2 months working on this quilt.
Creating the new Flame Stitch design really rocked my world. As I quilted the flame designs and endless background space, I began to form a theory about free motion quilting designs and how this thread texture can change the look of our quilts.
I knew that the quilting design was going to largely depend on which fillers I chose to place on the quilt and where. This became the basis for my blog The Free Motion Quilting Project and the reason why I decided to challenge myself to make 365 new free motion quilting designs.
The quilting of this quilt took a LONG time. I was hoping to have it done by July 1st, 2009 in time to enter it into the Asheville, NC quilt show. Eventually I had to come to the realization that it simply would not be done in time and this lack of pressure allowed me to finish the quilting earlier than I thought possible!
But remember my idea to paint the quilt after quilting it? Usually when I bind a quilt, that's the very last step. Not so in this quilt. I was only just getting started.
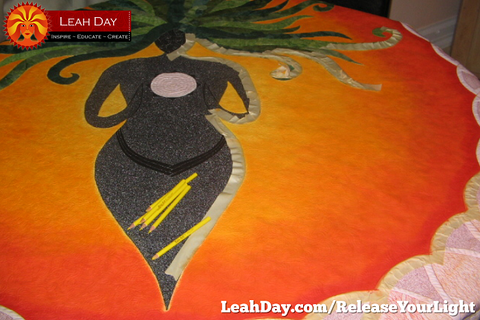
I began painting the center with yellow colored pencils, but the effect really wasn't what I wanted. The quilt was turning into a big yellow banana, not the vibrant, explosive sunshine I was after.

So I used Shiva Paintstiks over the colored pencils to create the color variation blending smoothly from yellow to orange to red.
To protect the other areas of the quilt, I used masking tape along the lines where one design met another. See the masking tape over the triangle rays?
This took a lot of experimenting and blending to get just right. The nice thing about Paintstiks is you can keep adding and layering color, especially when the paint is warm from your hands.
The center was finished very quickly, but the borders took forever! I had begun to realize just how big this quilt was while quilting the many rays. Now having to paint each of them, I was doubly reminded. Here's a video of how I quilted this section:
With the borders, I began with the darkest color, black and sealed it before moving on to the red, yellow, and orange rays. Each of the areas needed to be sealed before painting an adjacent ray, so it wasn't just like painting the quilt once, it was like painting it twice!
I find it almost funny now (about a month after the fact) that I seriously thought that painting this quilt would be easier than appliqué. It just goes to show that even if something sounds easier on paper, it probably isn't.
The paint and sealer also made this quilt not feel anything like a quilt. The surface feels stiff and slightly tacky. I'm certain that no paint can rub off, but the quilt will always have a slightly rubbery texture instead of feeling like fabric.
The Duchess taught me a lot about design, especially in the time consuming areas of the borders. Apparently I hadn't really learned my lesson! This quilt has taught me to take a lot more time on a design. In fact, the design process should take almost as much time as the quilting process. I rush these areas because I get so excited and want to jump right in.
But it pays to chill out, take your time, and really plan every aspect of a quilt before taking off with it.
Honestly, if I could do it all over again, I probably wouldn't change anything. Release Your Light is perfect because it finished exactly the way I originally envisioned it. Yes, it was challenging! Yes, I cried a lot during the making of this quilt! But every stitch and every hour was worth it to see the finished quilt.
Release Your Light was shown at three shows and won the following awards:
Foothills Quilter's Guild Show - October 2009
Awarded Best in Show, Best Machine Quilting, 1st Place Art Quilt
North Carolina Quilt Symposium - May 2010
Awarded Best Machine Quilting
Asheville Quilt Show - August 2010
 |
If you died tomorrow, what would you most regret not doing? Do you have a dream achievement, a special project you long to focus on? Have you been putting off this dream for years? This beautiful 3-month daily planner includes undated blank calendars so you can fill in the spaces to fit any month of the year. |


